If you've ever wanted to build a website hero section that genuinely stops people in their tracks — one with a 3D object floating in front of your text, reacting to mouse movement, and animating as you scroll — this tutorial is for you. We're combining three powerful tools: Spline for the 3D object, Unicorn Studio for the interactive background, and Webflow to tie it all together into a polished, production-ready website.
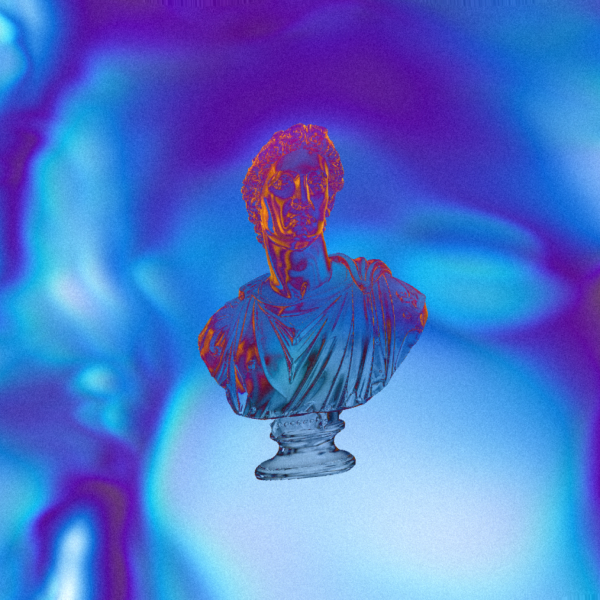
Here's what the finished result looks like: text sits behind a 3D object, a subtle animated background responds to your mouse movements, and as you scroll down the page, the 3D object rotates and moves through the scene. It's the kind of effect that looks incredibly complex but is surprisingly achievable once you understand how the three tools talk to each other.
Here are the links to help you get started:
Webflow Cloneable: https://webflow.com/made-in-webflow/website/brick-8ad265-3b0704593ef4-25353937193ed
Spline Asset: https://app.spline.design/community/file/26fb07f8-10f5-4f4c-85d8-da0a29037664
Unicorn Studio Scene: https://www.unicorn.studio/remix/WUCjMWW7YB71e00fUvyN
Step 1: Get the Spline Asset
Start by heading to Spline and creating a free account. From the community tab, search for JackRedley (no space) and you'll find a collection of 3D assets — grab the one used in this tutorial by clicking Remix. This copies the file directly into your own Spline account so you can work with it freely.
A quick look at how the object is built
Inside the file you'll find a fairly simple but effective scene structure:
- Camera — controls the viewing angle
- Point light — adds dramatic shading to the object; hide it and you'll immediately see what a difference it makes to the overall feel
- Total brick — the main 3D object, built from a combination of cubes using a Boolean operation (where shapes are subtracted from one another to create cutouts), plus corner elements and a logo
You don't need to rebuild this from scratch — that's the beauty of remixing. But understanding the structure helps when you need to reference individual elements later in the animation step.
Exporting from Spline
Before embedding the asset, you need to configure it for web use. Click Export, then go to Play Settings and turn off the following:
- Logo
- Background colour
- Keep page scroll
- Cursor orbit
These are all disabled because the animations will be driven by Webflow — not by Spline's built-in interaction system. Once everything is off, make sure to enable the Public URL toggle so your settings are saved. Then click Viewer and copy the embed URL.
Step 2: Set Up Webflow
Clone the Webflow template linked in the video description. Inside, you'll find a structure with a page wrap, a content header, and a content section.
Adding the Spline object
Inside the content header, add a Spline element from the Webflow component panel. Give it a class name — something like spline-object — then open its Settings and paste in the URL you copied from Spline.
Your 3D object will appear, but it'll likely be sitting on top of everything and won't be sized correctly. Here's how to fix that:
- Size it to fill the viewport — set the width to
100vwand the height to100vh - Set its position to Fixed — this pins it behind the page content as you scroll
- Adjust the Z-index — the hero section sits at Z-index 2, so set your Spline object to Z-index 3 to bring it in front of the text
If you want the object to sit behind specific elements, you can dial the Z-index down accordingly.
Step 3: Animate the Spline Object on Scroll
This is where things get really interesting. Head to Interactions in Webflow and create a new scroll animation — call it something like Spline Demo. Set the trigger to While Page Scrolling.
The scroll progress runs from 0 (top of page) to 100 (bottom), so for a short page the animation needs to happen fairly quickly.
Configuring the keyframes
Select your Spline object and set the start state (0%):
- Position: centred (X: 0, Y: 0)
- Scale: slightly smaller than full size (to give a sense of the object growing as you scroll)
Then set the end state (100%):
- Scale: 1, 1, 1 (full size)
- Rotation: add a Y-axis rotation value of around
6.2(one full rotation) to make the object spin as you scroll
Important: if you only set a scale without any rotation, the 3D object has no visual advantage over a flat image — the whole point of using Spline is to show that depth and dimension. Adding the rotation brings the 3D to life.
Use Live Preview in Webflow to test as you go. You may want to tweak the vertical position values so the object exits the screen gracefully before it reaches the grey section below — values around -1.15 at the top and -7.50 at the bottom work well, but experiment to suit your design.
Step 4: Add the Unicorn Studio Background
Now for the final layer — the reactive background. Unicorn Studio lets you create animated, mouse-reactive canvas backgrounds and embed them with a single HTML snippet.
Building the scene
In Unicorn Studio, the background effect is built up from several layered elements:
- Background fill — a flat white base
- Noise fill — a subtle texture layer that adds depth without being distracting
- Beam — a dark, light-shaped gradient originating from the centre of the screen, set to Hard Light blend mode
- Glyph dither preset — a built-in Unicorn Studio preset that adds a pixel-style texture; perfect for a retro aesthetic
- Chromatic dither — a very subtle animated layer (keep the speed around 25 to avoid giving your visitors a headache)
- Vignette — a white feathered edge that draws the eye toward the centre, keeping focus on the 3D object
- Stipple — a grainy, almost 90s-style texture that gives the whole thing a tactile, analog feel
The key insight with Unicorn Studio is that you can radically change the look just by tweaking blend modes, opacity, and colours. Don't be afraid to experiment — small adjustments have a surprisingly big visual impact.
Embedding in Webflow
Once you're happy with the scene, click Export → HTML to copy the embed code. Back in Webflow, add a custom HTML embed element, paste in the code, then set its width to 100vw and height to 100vh. Save, close, and publish.
The Result
With all three tools connected, you now have:
- A 3D object (Spline) that rotates and scales as the user scrolls
- A reactive animated background (Unicorn Studio) that follows the user's mouse
- Everything orchestrated in Webflow with precise scroll-linked interactions
It's a genuinely impressive combination — and once you've built it once, you'll find yourself reaching for this stack again and again.
Want to learn how to model the 3D object itself in Spline, or go deeper into Unicorn Studio's layer system? Drop a comment below — more tutorials are coming.